I guess I have candy on my mind as I have been looking for fun things to print for Halloween. I recently printed some fun vertebrae with hidden compartments.


I found that these will hold only three peanut butter M&M’s, which are the best M&M’s in my personal opinion. But that is not enough candy…so I guess these will be tricks instead of treats. I did find that you can fit eight quarters within the secret compartment, so some lucky kid might get a nice surprise.
Speaking of peanut butter M&M’s, I like having some of these around while I am working. I always seem to be working on something as I am a pastor, a remote office manager for a small company from my hometown, and I am trying to make a few extra dollars with my 3D printers. I like having these little snacks but I do not need to grab a handful at a time. That is when I began looking to see if there were any candy machine files available on my favorite 3D printing communities.
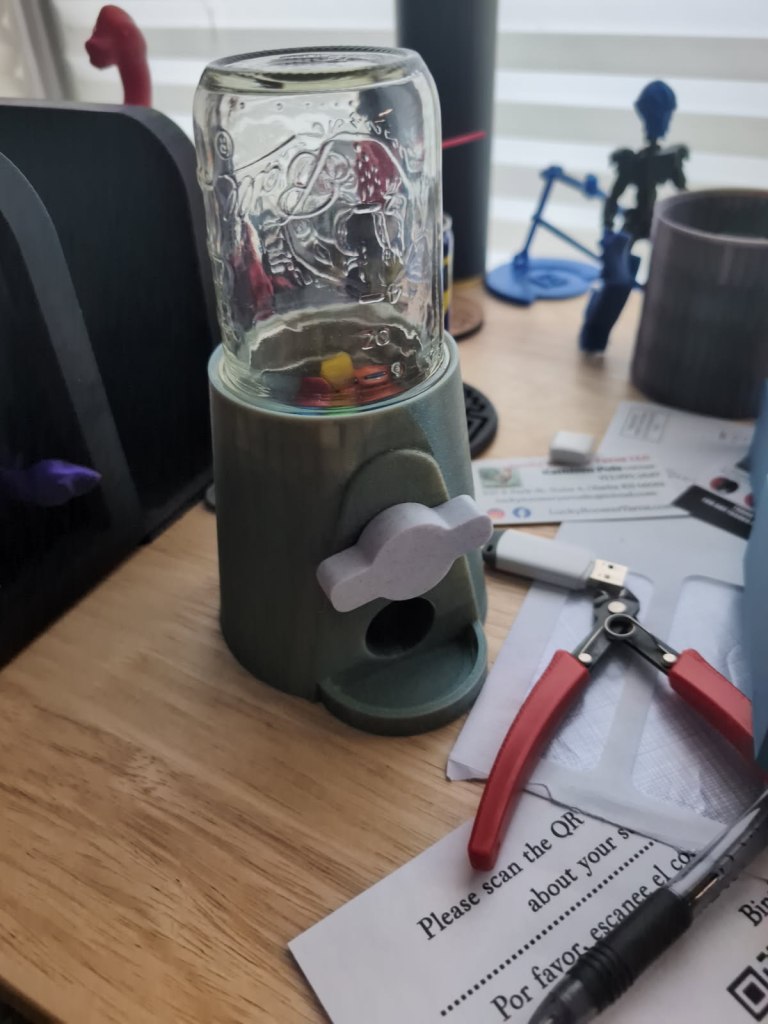
I wanted a dispenser that had the nob, i did not need the coin mechanism but I wanted to be able to have the container use a regular jar I had around the house. I began to search for Mason Jar Candy Machine. (Click the link to see what it brings up). I was not disappointed. Not only were there several options, some of those options did not require any extra hardware (other than the jar).
That was good for me since I have not tried to do the fancy thread inserts and screws with 3D printing, or embedding magnets. This is something I hope to try as I begin to make some items for Christmas. I decided to download Carl Belcher’s Simple Mason Jar Candy Machine – Updated with printable pin for assembly.
This worked great with peanut butter M&M’s. It releases 1 or 2 at a time, which is a great rate for a little snack while I am watching something print, or when I am studying. Then other projects had to be done.
Had might not be the proper word, I found some fun Altoids tin projects and I began to print off some of the games that I found in that collection. The only problem with this was i needed another tin. I bought a tin and dumped the contents into the jar so I could complete my Altoids Tin Battleship project. Altoids work great in the machine too, with them the machine releases 2-3 at a time, which is the amount I usually like at one time.
Then one day my wife went out to lunch with a friend, and her friend gave her a jar of freeze dried skittles. I love these, so they had to go into the machine. Later one we went out with this friend again and I mentioned that I made this mason jar candy machine and that it worked pretty good with the skittles. (occasionally some of the skittles would get stuck because the freeze drying process sometimes gives them odd shapes.) She loved the idea and asked if i could print another.
Of course I can!
I actually printed a couple because why not.

These candy machines use the narrow mouth jelly, pint, or quart jars. I tried M&M’s, Altoids, freeze dried Skittles, and freeze dried blue berries. Some candies work better than others, and of course the size is limited by the opening. I am not a big gum ball fan so I could not advise on how well they would work., but I am 100% satisfied.
This design by Carl Belcher would make a great gift to pretty much anyone that has a desk, sweet tooth, or likes the sense of nostalgia. It uses approximately 155.10 grams of Filament, and takes approximately 6 hours of print time, for the three parts. (The base, knob, and pin). You might be able to shorten the time by printing it all the same color, but what fun would that be? For the traditional feel, I recommend Inland Shimmer Red PLA and a shimmer Twilight PLA for the knob. Since these both have the shimmer aspect to them the cost a bit more than the base colors, but I feel it gives it the traditional feel.
Mr. Belcher has left this model open for commercial applications so they can be ordered if you would like one. The base without the jar would cost $24.76 plus shipping (if needed).
Feel Free to contact me: pastor@jwquaker.com


Leave a comment